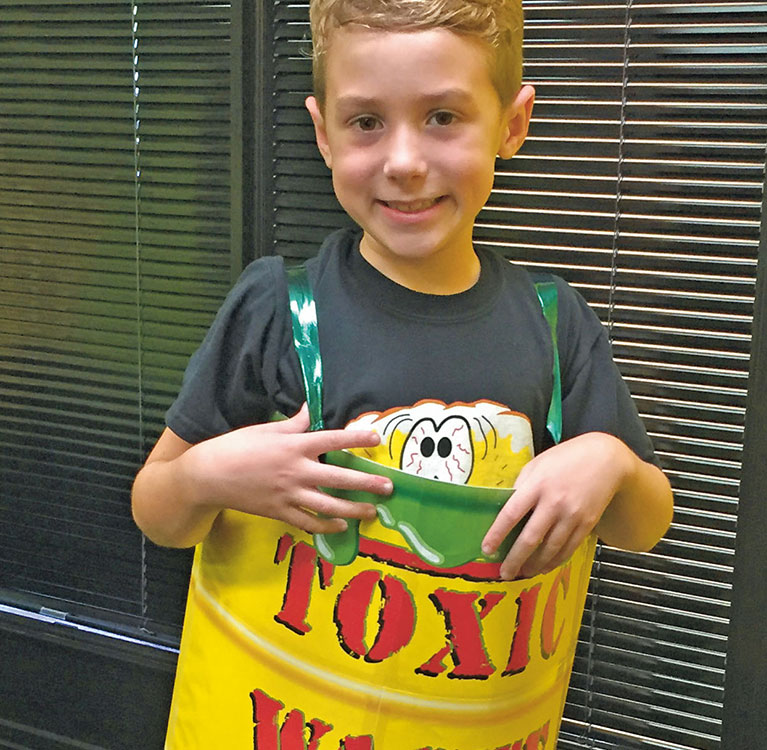
Ask a grown up to help you make this cool Toxic Waste costume!
This costume idea was suggested by Toxic Waste super fan Ryker from Oregon. Thanks, Ryker!
What you’ll need
- 2 – 22” x 28” poster boards
- Cellophane tape
- Duct tape
- 1/2” to 1” wide green ribbon
- Pencil
- Scissors
- Hole punch (optional)
- Yardstick
- Access to a color printer
Step 1
Print out this PDF on a color printer on 8-1/2 x 11 inch paper. Make sure you are printing at full size, not “reduced to fi t” so the pieces are properly scaled. There should be a 1/4 inch white margin around the artwork. You may want to do this at your local copy/print shop or office supply store rather than at home, or you will use a lot of yellow ink!
Step 2
Using scissors, cut away the white outer area of each sheet, leaving only the artwork. Notice that each sheet has a Number/Letter code on the lower right hand side. These will help you keep track of where each piece goes.
Step 3
Take one of your poster boards and measure 2 inches in from one of the short sides. Mark this measure in a couple of places, then, using your yard stick, draw a pencil line along them.
Step 4
Lay the second poster board along the line and tape it in place to make a single piece measuring 54 inches wide by 22 inches tall. Once the front is secure, tape over the back side seam with Duct Tape to make it secure.
Step 5
Starting with Art Piece 1A, tape it in the upper left corner of the connected poster board. You will need to align it against the top and left sides. Tape down the right side and bottom edge of the Art Piece first, then tape the other two sides by wrapping the tape around the edge to the back of the poster board.
Step 6
Place Art Piece 2A next, aligning the top edge against the edge of the poster board and sliding the paper left or right until the pattern of the artwork lines up with the previous piece. You will be able to tell it is in line when the fl ow of the green “goop” and the letter shapes match up. There should be about a 1 inch overlap. Each new piece covers up the Number/Letter code of the previous piece. Tape this piece down as before.
Step 7
Repeat this process with Art Pieces 3A through 6A, fi lling in the first row across.
Step 8
Tape Art Piece 1B against the left side of the poster board to start a second row, overlapping the bottom of the Art Piece above it. You will be able to tell it is in the correct place when the shading at its top edge matches the shading of the pieces it overlaps. In areas without obvious details for left/right alignment, line up with the edge of the piece above. There should be about a 1 inch overlap.
Step 9
Repeat this process with Art Pieces 2B through 6B, fi lling in the second row across.
Step 10
Begin the final row of Art Pieces by taping 1C against the bottom left of the poster board. Continue with Art Pieces 2C through 6C. After all pieces are in place, make sure all loose edges covering the whole board are taped down securely, as well as the whole board edge.
Step 11
With the child standing, wrap the poster board around the body, a little below the armpits, leaving room for free movement. The left edge of the poster board should be on the outside. Using a pencil, make a mark at the desired overlap point. Unwrap the child and rewrap the poster board to the marked circumference. While holding the poster board to form a cylinder of the desired size, tape the outer seam in two or three places to secure the shape; then, place the cylinder on a table seam-side down. With Duct Tape, secure the inside seam completely. Next, secure the complete outside seam with clear Cellophane Tape.
Step 12
On the inside surface, near the top edge of the front side, place a square of Duct Tape aligned with the small, yellow dots above the “T” and “C” in “TOXIC.” These are the front connection points for the Ribbon suspenders which will hold up the costume. The patch of Duct Tape will help reinforce the hole. Punch a hole through the yellow dots and thread a length of ribbon through each one. Tie the ribbon securely, but do not crimp the poster board, which would weaken it.
Step 13
Choose two spots on the back side of the costume to attach the suspender ribbons to. The placement will vary, depending on the size of child you are fi tting the costume for. These should be placed closer together than the front holes to help keep the suspenders on the child’s shoulders. Once chosen, place Duct Tape squares on the inside surface and punch the holes. Thread each ribbon through its adjacent hole, but do not tie them off.
Step 14
Have the child put on the costume and hold it at a comfortable level. Pull each suspender to remove the slack and tie it off, taking care not to crimp the poster board. Trim away any excess ribbon.
The costume is complete! Trick-or-Treat safely!
© 2018